|
|
~ TIPS & TRICKS TO ENHANCE YOUR MODELING SKILLS ~
Please be patient. Large photos loading. . . CORRECTING & ADJUSTING EARLY TOMALCO ® TURNOUTS
~ Updated Friday, February 06, 2009 ~
|
|

|
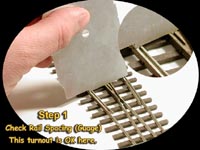
Here in Step #8, Jimmy is making sure his "fix" is a good one. And as
you can see, it is !
An NMRA "Sn3" Standards Gauge is really helpful for this operation. One of our PBL-538 ( Plastic ); PBL-538c ( Celcon ); or PBL-016 ( Brass ) Three Point Track / Coupler Height Gauges will work too, but with an NMRA Standards Gauge it's easier to see and correct potential problems. We highly recommend that you have at least one of each in your tool kit. |
And here's the final product. And of course, the real proof is in the testing
of it with an operating model. Our K-28 glides through it smooth as glass!
My own preferences would dictate that, if my turnout wasn't already in place during these operations, I would drill a couple of #75 holes adjacent to the guard rail, then drive a couple of spikes home when the turnout was correctly positioned. But just so's you know, Jimmy tried his darndest to knock that guardrail loose; broke his thumbnail trying. It didn't budge. |
|
[ Not to mention that, even after discovering this problem, they're still a darn sight faster than hand laying the things would be! ] Good "Sn3" Modelin' to ya! The Guys and Gals at P-B-L Click the Icon above to go back to Page One of our Tomalco Turnout Fix project !
Or, how'd we do? Did you find these pages helpful? If so,
Click Here
to email us your comments / suggestions !
|
